Today I will talk a little about Home Assistant and the advantages of using it. For anyone getting started with home automation, I think it makes controlling devices much easier.
In my case, I started automating my home with Wi-Fi devices and never cared about the brand. That was a mistake, because ideally you should keep everything from the same brand to make app management easier. After I had already done that, I managed to link most of my devices to Home Assistant and I am still configuring things. This process feels endless, but it is satisfying when everything is concentrated in one place.
Where I installed Home Assistant
![]()
The notebook above is what I used to install the Home Assistant server. Its configuration is not great, but it has served me well for what I need. You can install Home Assistant on an old notebook, as I did, or on an embedded device such as a Raspberry Pi or mini PC.
The notebook is an Acer Aspire 5580 with 2 GB of memory and a 240 GB SSD. Its board had an IDE connector, so I bought an IDE-to-SATA adapter that worked well.
The blue device next to it is a Wi-Fi board powered by USB that receives the network through an Ethernet cable. I used it because this notebook's Wi-Fi card kept disconnecting, and with this other board it became more stable. I still want to try to solve that. The notebook also has no battery anymore, but maybe in the future I will buy another one and upgrade the RAM from 2 GB to 4 GB, since importing it seems worth it.
Which Home Assistant version I installed
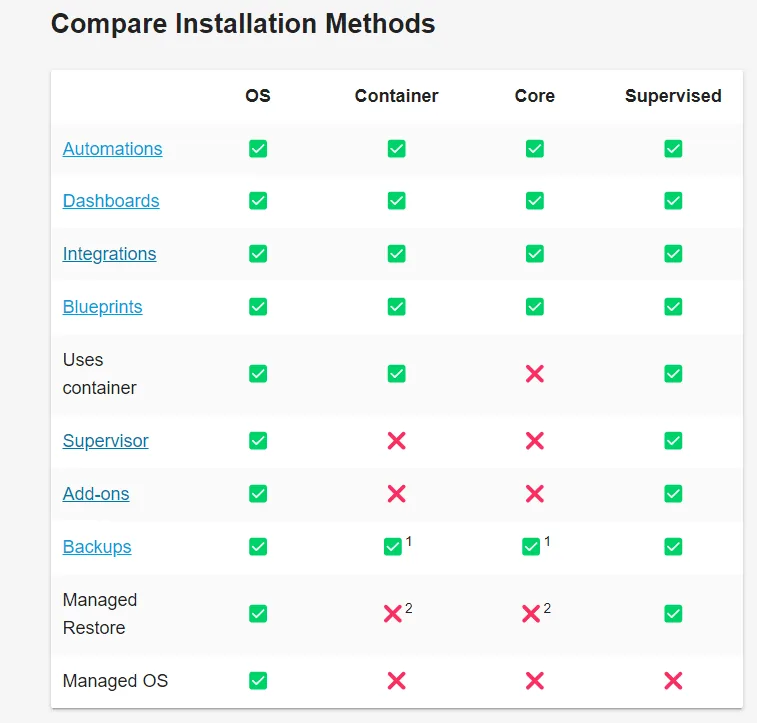
Above are the 4 ways to install Home Assistant. I installed the Container version. My suggestion is: if you know Linux, install the Container version because it uses Docker and gives you more freedom to install other images and services on the system.
For those who want something more practical and will use the machine only for Home Assistant, I suggest the OS or Supervised version.
How I installed it
On the Home Assistant website, the procedure is very simple. I first installed Ubuntu 22.04 Server and followed the instructions here: https://www.home-assistant.io/installation/linux#install-home-assistant-container. Remember that this installation method requires Linux knowledge, so if you do not have that knowledge, this method is not for you.
Advantages and disadvantages of container mode
The container installation gives you more freedom in the system, letting you install and configure several services you may want. The downside is that some configurations end up being more work than using OS or Supervised. In OS and Supervised there is an add-ons menu where you can install several components easily. Another disadvantage is that most things require Linux knowledge.
Quick flow for installing Home Assistant in container mode
Install Ubuntu Server and select OpenSSH during setup.
Configure a fixed IP in the operating system or router so you can always access the machine through SSH using the same IP. This will also be useful for accessing Home Assistant on the local network.
Update the system with sudo apt-get update and sudo apt-get upgrade, then install Docker with sudo apt install docker.io.
Run the command to install the image:
Note: Change PATH_TO_YOUR_CONFIG to where you want to store the settings. In my case I chose /home/myusername, but you can choose any location you want.
docker run -d \--name homeassistant \--privileged \--restart=unless-stopped \-e TZ=America/Sao_Paulo \-v /PATH_TO_YOUR_CONFIG:/config \--network=host \ghcr.io/home-assistant/home-assistant:stable
- After that, open http://IP:8123 and you should be able to access Home Assistant.
Comments
Join the conversation
Loading comments...